

When we last looked at the PowerShell App Deployment Toolkit, we looked at a simple example of installing Visual C++ Runtime, which does not show the power of using the toolkit. In this post, we want to look at a more complete example of using the toolkit to save time and effort creating deployment scripts.
Toolkit Configuration
But first, we want to look into some of the configuration options of the toolkit. The toolkit folder has a file called AppDeployToolkitConfig.xml. This contains all the default configurations which will be used for all deployments.
<Toolkit_Options>
<Toolkit_RequireAdmin>True</Toolkit_RequireAdmin>
<!-- Specify if Administrator Rights are required. NB: Some functions won't work if this is set to false, such as deferral, blockexecution, file & registry RW access and potentially logging. -->
<Toolkit_TempPath>$envSystemDrive\Users\Public</Toolkit_TempPath>
<!-- Path used to store temporary Toolkit files (with PSAppDeployToolkit as subdirectory), e.g. cache toolkit for cleaning up blocked apps. -->
<Toolkit_RegPath>HKLM:SOFTWARE</Toolkit_RegPath>
<!-- Registry key used to store toolkit information (with PSAppDeployToolkit as child registry key), e.g. deferral history. -->
<Toolkit_LogPath>$envWinDir\Logs\Software</Toolkit_LogPath>
<!-- Log path used for Toolkit logging. -->
<Toolkit_CompressLogs>True</Toolkit_CompressLogs>
<!-- Specify if the log files should be bundled together in a compressed zip file -->
<Toolkit_LogStyle>CMTrace</Toolkit_LogStyle>
<!-- Specify if log file should be a CMTrace compatible log file or a Legacy text log file. -->
<Toolkit_LogDebugMessage>False</Toolkit_LogDebugMessage>
<!-- Specify if debug messages such as bound parameters passed to a function should be logged. -->
<Toolkit_LogMaxSize>10</Toolkit_LogMaxSize>
<!-- Specify maximum file size limit for log file in megabytes (MB). -->
<Toolkit_LogWriteToHost>True</Toolkit_LogWriteToHost>
<!-- Specify if log messages should be written to the console. -->
</Toolkit_Options>
I’ve made 1 change here, which is to compress the log files
<Toolkit_CompressLogs>True</Toolkit_CompressLogs>The MSI log files can get very big for large application, so compression helps. Also, having 1 log files allows for easier troubleshooting later, as we only need to copy 1 compressed file, instead of many files in a subfolder.
<MSI_Options>
<MSI_LoggingOptions>/L*v</MSI_LoggingOptions>
<!-- Logging level used for MSI logging. -->
<MSI_LogPath>$envWinDir\Logs\Software</MSI_LogPath>
<!-- Log path used for MSI logging. -->
<MSI_InstallParams>REBOOT=ReallySuppress /QB-!</MSI_InstallParams>
<!-- Installation parameters used for non-silent MSI actions. -->
<MSI_SilentParams>REBOOT=ReallySuppress /QN</MSI_SilentParams>
<!-- Installation parameters used for silent MSI actions. -->
<MSI_UninstallParams>REBOOT=ReallySuppress /QN</MSI_UninstallParams>
<!-- Installation parameters used for MSI uninstall actions. -->
<MSI_MutexWaitTime>600</MSI_MutexWaitTime>
<!-- The length of time in seconds to wait for the MSI installer service to become available. Default is 600 seconds (10 minutes) -->
</MSI_Options>
I have not made any changes to the MSI installation defaults here, though you can if you want to. For example, you might want to change the logging options to be less verbose (/L*) or change the uninstall parameter to be passive instead of silent (/passive or /QB!)
<UI_Options>
<InstallationUI_LanguageOverride></InstallationUI_LanguageOverride>
<!-- Specify a static UI language using the one of the Language Codes listed below to override the language culture detected on the system.
Language Code Language | Language Code Language
============= ======== | ============= ========
EN English | DA Danish
FR French | DE German
IT Italian | JA Japanese
NL Dutch | NB Norwegian (Bokmål)
PL Polish | PT Portuguese (Portugal)
ES Spanish | PT-BR Portuguese (Brazil)
SV Swedish | AR Arabic
HE Hebrew | ZH-Hans Chinese (Simplified)
KO Korean | ZH-Hant Chinese (Traditional)
RU Russian | SK Slovak
HU Hungarian
-->
<ShowBalloonNotifications>False</ShowBalloonNotifications>
<!-- [True/False] - Used to turn automatic balloon notifications on or off. -->
<InstallationUI_Timeout>6900</InstallationUI_Timeout>
<!-- Time in seconds to automatically timeout installation dialogs. Default is 1 hour and 55 minutes so that dialogs timeout before SCCM times out. -->
<InstallationUI_ExitCode>1618</InstallationUI_ExitCode>
<!-- Exit code used when a UI prompt times out or the user opts to defer. -->
<InstallationDefer_ExitCode>60012</InstallationDefer_ExitCode>
<!-- Exit code used when a user opts to defer. -->
<InstallationPrompt_PersistInterval>60</InstallationPrompt_PersistInterval>
<!-- Time in seconds after which the prompt should be repositioned centre screen when the -PersistPrompt parameter is used. Default is 60 seconds. -->
<InstallationRestartPrompt_PersistInterval>600</InstallationRestartPrompt_PersistInterval>
<!-- Time in seconds after which the restart prompt should be re-displayed/repositioned when the -NoCountdown parameter is specified. Default is 600 seconds. -->
<InstallationPromptToSave_Timeout>120</InstallationPromptToSave_Timeout>
<!-- Time in seconds after which to re-prompt the user to close applications in case they ignore the prompt or they cancel the application's save prompt. -->
</UI_Options>
Here I have changed the ShowBalloonNotifications option to false.
<ShowBalloonNotifications>False</ShowBalloonNotifications>Finally, the Toolkit folder also has a file called AppDeployToolkitBanner.png. You might want to edit this to fit your corporate image or colors.
The customized toolkit template should now be copied to a central location for all members of the team to use to customize for individual applications.
Deployment Script Configuration
I will be using Microsoft App-V 5.1 as an example here, as it contains some of the ingredients which makes deploying applications much more of a hassle.
I’ve structured the installation folders as below:
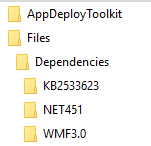
- The Files folder contains the App-V 5.1 Client installer, appv_client_setup.exe.
- The Dependencies root folder contains the x86 and x64 Visual C++ 2013 Runtime installers.
- The other Dependencies sub-folders are self explaining.
We will look at the following areas of interest
- Manipulate a service
- Check if a restart is pending
- Check if a specific Microsoft update is installed
- Check if a specific version of Microsoft .NET Framework is installed
- Check if a specific version of PowerShell is installed
- Check the OS Version
- Check if the current OS is 64bit
- Return a custom exit code
- Install Microsoft updates (MSU) files
- User prompts
There will be more we will also look at the few items above are the key ones to look at for now.
First, let’s see the full pre-installation code before we dissect the code in further detail.
##*===============================================
##* PRE-INSTALLATION
##*===============================================
[string]$installPhase = 'Pre-Installation'

#Show-InstallationProgress -StatusMessage "Enable and start Windows Update"
Set-ServiceStartMode -Name 'wuauserv' -StartMode 'Automatic'
Start-ServiceAndDependencies -Name 'wuauserv'

#test for pending reboot
$reboot = Get-PendingReboot

if ($reboot.IsSystemRebootPending -eq $true -or $reboot.IsCBServicingRebootPending -eq $true -or $reboot.IsWindowsUpdateRebootPending -eq $true -or $reboot.IsSCCMClientRebootPending -eq $true -or $reboot.IsFileRenameRebootPending -eq $true)
{
    #reboot pending, cannot proceed.
    Show-InstallationPrompt -Message "A reboot is pending on this machine. Please reboot this machine first before installing $installTitle" -ButtonRightText 'OK'
    Exit-Script -ExitCode 69004 #this code to indicate a reboot is pending on this machine, and installation cannot proceed.
}
#End

#test and install prerequisite software
Show-InstallationProgress -StatusMessage "Checking $installTitle prerequisite software"

#is .NET Framework 4.5.1 installed?
$netFrameworkVersionExists = Test-RegistryValue 'HKLM\SOFTWARE\Microsoft\NET Framework Setup\NDP\v4\Full' -Value 'Release'
if ($netFrameworkVersionExists -eq $true)
{
    $netFrameworkVersion = Get-RegistryKey -Key 'HKLM\SOFTWARE\Microsoft\NET Framework Setup\NDP\v4\Full' -Value 'Release'
    if ($netFrameworkVersion -lt 378675)
    {
        #this is the release ID for .NET Framework 4.5.1. See https://msdn.microsoft.com/en-us/library/hh925568
        #Show-InstallationPrompt -Message "Microsoft.NET 4.5.1 is not installed on this machine. Please install Microsoft.NET 4.5.1 before installing $installTitle" -ButtonRightText 'OK'
        #Exit-Script -ExitCode 69001 #this code to indicate correct .NET Framework version is not installed.

        Show-InstallationProgress -StatusMessage "Installing Microsoft NET Framework 4.5.1"
        Execute-Process -Path "$dirFiles\NET451\NDP451-KB2858728-x86-x64-AllOS-ENU.exe" -Parameters '/passive /norestart'
    }
}
else
{
    #Show-InstallationPrompt -Message "Microsoft.NET 4.5.1 is not installed on this machine. Please install Microsoft.NET 4.5.1 before installing $installTitle" -ButtonRightText 'OK'
    #Exit-Script -ExitCode 69001 #this code to indicate correct .NET Framework version is not installed.

    Show-InstallationProgress -StatusMessage "Installing Microsoft NET Framework 4.5.1"
    Execute-Process -Path "$dirFiles\NET451\NDP451-KB2858728-x86-x64-AllOS-ENU.exe" -Parameters '/passive /norestart'
}

#is KB2533623 installed on Windows 7?
if ($envOSVersionMajor -eq 6 -and $envOSVersionMinor -eq 1)
{
    $isKBInstalled = Test-MSUpdates -KBNumber 'KB2533623'
    if ($isKBInstalled -eq $false)
    {
        Show-InstallationProgress -StatusMessage "Installing KB2533623 for Windows 7"
        Install-MSUpdates -Directory "$dirFiles\Dependencies\KB2533623"
    }
}

#install Visual C++ Runtime 2013
Show-InstallationProgress -StatusMessage "Installing Visual C++ Runtime 2013"
Execute-Process -Path "$dirFiles\Dependencies\vcredist_x86.exe" -Parameters '/passive /norestart'
if ($Is64Bit -eq $true)
{
    Execute-Process -Path "$dirFiles\Dependencies\vcredist_x64.exe" -Parameters '/passive /norestart'
}

#is Powershell 3.0 installed?
if ($envPSVersionMajor -lt 3)
{
    $response = Show-InstallationPrompt -Message "Powershell 3.0 is not installed on this machine. Powershell will now be installed, and you need to reboot your machine after the installation. `n`nClick Install Now to install Powershell 3.0 or Install Later to install Powershell 3.0 later and cancel the current installation" -ButtonLeftText 'Install Now' -ButtonRightText 'Install Later'
    if ($response -eq 'Install Later')
    {
        Exit-Script -ExitCode 69002 #this code to indicate user clicked to install PowerShell later.
    }
    else
    {
        Show-InstallationProgress -StatusMessage "Installing PowerShell 3.0"
        Install-MSUpdates -Directory "$dirFiles\Dependencies\WMF3.0"
        #Show-InstallationRestartPrompt -NoCountdown
        Exit-Script -ExitCode 3010 #soft reboot exit code. This will cause SCCM to prompt users to reboot their machine
    }
}
#end
Manipulate a service
#Show-InstallationProgress -StatusMessage "Enable and start Windows Update"
Set-ServiceStartMode -Name 'wuauserv' -StartMode 'Automatic'
Start-ServiceAndDependencies -Name 'wuauserv'
Code snippet shows the built in toolkit functions to set a service start mode and then to start a service. We are starting the Windows Update service here, because we will be installing some updates later on. Without the Windows Update service enabled and running, the update installation will fail. A service can also be stopped using the Stop-ServiceAndDependencies function.
E.g.
Stop-ServiceAndDependencies -Name "wuauserv"Check if a restart is pending
#test for pending reboot
$reboot = Get-PendingReboot
if ($reboot.IsSystemRebootPending -eq $true -or $reboot.IsCBServicingRebootPending -eq $true -or $reboot.IsWindowsUpdateRebootPending -eq $true -or $reboot.IsSCCMClientRebootPending -eq $true -or $reboot.IsFileRenameRebootPending -eq $true)
{
    #reboot pending, cannot proceed.
    Show-InstallationPrompt -Message "A reboot is pending on this machine. Please reboot this machine first before installing $installTitle" -ButtonRightText 'OK'
    Exit-Script -ExitCode 69004 #this code to indicate a reboot is pending on this machine, and installation cannot proceed.
}
#End
Get-PendingReboot is a built in toolkit function to get all reboot pending status. The toolkit will check the following areas to determine if a reboot is pending:
- Component Based Servicing
- Windows Update / Auto Update
- SCCM 2012 Clients
- Pending File Rename Operations
If one is found, one of the following values will be set to true
- IsSystemRebootPending
- IsCBServicingRebootPending
- IsWindowsUpdateRebootPending
- IsSCCMClientRebootPending
- IsFileRenameRebootPending
You can then specifically check one, a few or all of it to determine if a reboot is pending. The App-V install will also check if a reboot is pending and fail to install if a pending reboot is detected. In most cases, you can just check for IsSystemRebootPending.
Check if a specific version of Microsoft .NET Framework is installed
#is .NET Framework 4.5.1 installed?
$netFrameworkVersionExists = Test-RegistryValue 'HKLM\SOFTWARE\Microsoft\NET Framework Setup\NDP\v4\Full' -Value 'Release'
if ($netFrameworkVersionExists -eq $true)
{
    $netFrameworkVersion = Get-RegistryKey -Key 'HKLM\SOFTWARE\Microsoft\NET Framework Setup\NDP\v4\Full' -Value 'Release'
    if ($netFrameworkVersion -lt 378675) #this is the release ID for .NET Framework 4.5.1. See https://msdn.microsoft.com/en-us/library/hh925568
    {
        #Show-InstallationPrompt -Message "Microsoft.NET 4.5.1 is not installed on this machine. Please install Microsoft.NET 4.5.1 before installing $installTitle" -ButtonRightText 'OK'
        #Exit-Script -ExitCode 69001 #this code to indicate correct .NET Framework version is not installed.

        Show-InstallationProgress -StatusMessage "Installing Microsoft NET Framework 4.5.1"
        Execute-Process -Path "$dirFiles\NET451\NDP451-KB2858728-x86-x64-AllOS-ENU.exe" -Parameters '/passive /norestart'
    }
}
else
{
    #Show-InstallationPrompt -Message "Microsoft.NET 4.5.1 is not installed on this machine. Please install Microsoft.NET 4.5.1 before installing $installTitle" -ButtonRightText 'OK'
    #Exit-Script -ExitCode 69001 #this code to indicate correct .NET Framework version is not installed.

    Show-InstallationProgress -StatusMessage "Installing Microsoft NET Framework 4.5.1"
    Execute-Process -Path "$dirFiles\NET451\NDP451-KB2858728-x86-x64-AllOS-ENU.exe" -Parameters '/passive /norestart'
}
The App-V installer also needs .NET Framework 4.5.1. We can check if the framework is install and if the framework is not installed, installed it. There is a specific registry we can use to check if .NET Framework 4.5.1 is installed. Microsoft has a MSDN article here which has more specific details. First, we test if the registry key exists using the built in function Test-RegistryValue, and if it does, we use the built in function Get-RegistryKey to check if the value is less than the .NET Framework 4.5.1 release number.
If the release number is less than .NET Framework’s release number, or if the registry does not exists, we install .NET Framework 4.6.1.
We use the variable $dirFiles for sub directories in the Files folder. If what we need is directly in the Files directory, we do not need to use the variable $dirFiles.
Check if a specific Microsoft update is installed
$isKBInstalled = Test-MSUpdates -KBNumber 'KB2533623'
if ($isKBInstalled -eq $false)
{
    Show-InstallationProgress -StatusMessage "Installing KB2533623 for Windows 7"
    Install-MSUpdates -Directory "$dirFiles\Dependencies\KB2533623"
}
App-V 5.1 on Windows 7 also requires the update KB2533623 to be installed. We use the built in function Test-MSUpdates to check if a Microsoft update is installed. The function returns true or false, and from there, we can determine if we need to install the update.
We specify the directory which has the update we want to install, using the built in function Install-MSUpdates. This function uses Wusa.exe to install the Windows update files.
Check if a specific version of PowerShell is installed
#is Powershell 3.0 installed?
if ($envPSVersionMajor -lt 3)
{
    $response = Show-InstallationPrompt -Message "Powershell 3.0 is not installed on this machine. Powershell will now be installed, and you need to reboot your machine after the installation. `n`nClick Install Now to install Powershell 3.0 or Install Later to install Powershell 3.0 later and cancel the current installation" -ButtonLeftText 'Install Now' -ButtonRightText 'Install Later'
    if ($response -eq 'Install Later')
    {
        Exit-Script -ExitCode 69002 #this code to indicate user clicked to install PowerShell later.
    }
    else
    {
        Show-InstallationProgress -StatusMessage "Installing PowerShell 3.0"
        Install-MSUpdates -Directory "$dirFiles\Dependencies\WMF3.0"
        #Show-InstallationRestartPrompt -NoCountdown
        Exit-Script -ExitCode 3010 #soft reboot exit code. This will cause SCCM to prompt users to reboot their machine
    }
}
#end
App-V 5.1 also requires at least Powershell 3.0 to be installed. For Windows 8 onwards, this is not an issue, as Powershell 3.0 is available out of the box. But for Windows 7, this needs to be installed first. This site has a table which lists the supported version of Powershell on each OS and which version of PowerShell is available out of the box for each OS.
Since we are using the toolkit, which is based on Powershell, finding out the current available Powershell version is much easier. We read the toolkit’s built in variable $envPSVersionMajor which tells us the current Powershell version. If the version is less than 3, we install Powershell 3.0.
Check the OS Version
if($envOSVersionMajor -eq 6 -and $envOSVersionMinor -eq 1)Earlier, we looked and check for update KB2533623 on Windows 7. We use the toolkit’s built in variable $envOSVersionMajor and $envOSVersionMinor to check the OS version.
Fun fact, when I first started developing the script, I actually tried to check if $envOSVersionMajor -eq 7. It left me puzzled for a while because the script was bypassing the KB2533623 installation, until I realized Windows 7 is actually version 6.1 🙂
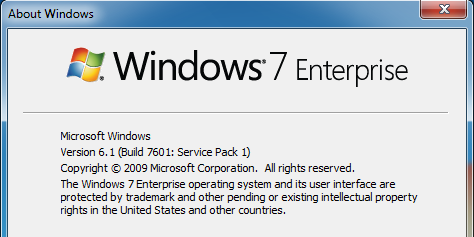
Thanks Microsoft for the “consistent” naming and numbering.
Check if the current OS is 64bit
if($Is64Bit -eq $true)This is a particularly common check. There were many ways I have seen this done in VBScript or using batch files. But with the toolkit, it is a single variable. We check if the variable $Is64Bit is true.
There are other variable you might want to combine or use. $envOSArchitecture returns the string representing the OS Architecture (32-Bit/64-Bit). You might also need to check for a Server OS using $IsServerOS (true/false).
A rare but depending on your circumstances, maybe necessary check, is to see what process is running the script file, using the variable $Is64BitProcess (true/false) or get the exact process architecture using $psArchitecture (32-Bit/64-Bit). This might be useful for cases where the OS architecture might be 64-bit, but the Powershell is running as a 32-bit process. A rare case, but you can check if you need to.
Return a custom exit code
Exit-Script -ExitCode 69004 #this code to indicate a reboot is pending on this machine, and installation cannot proceed.
Exit-Script -ExitCode 69001 #this code to indicate correct .NET Framework version is not installed.
Exit-Script -ExitCode 69002 #this code to indicate user clicked to install PowerShell later.
You can terminate the script execution at any point during the installation, using the Exit-Script function, and return a custom exit code. The toolkit recommends you use a code range of 69000 – 69999 for custom exit code. You can also pass through the exit code from your installer as well (more on this later) but using a custom exit code allows you do provide specific end points to determine what went wrong on each client machine.
User prompts
$response = Show-InstallationPrompt -Message "Powershell 3.0 is not installed on this machine. Powershell will now be installed, and you need to reboot your machine after the installation. `n`nClick Install Now to install Powershell 3.0 or Install Later to install Powershell 3.0 later and cancel the current installation" -ButtonLeftText 'Install Now' -ButtonRightText 'Install Later'
if ($response -eq 'Install Later')
{
    Exit-Script -ExitCode 69002 #this code to indicate user clicked to install PowerShell later.
}
Using the built in function Show-InstallationPrompt, we can show a custom prompt to the user, requesting for up to 3 responses. The responses are in forms of buttons on the left, right, and middle of the dialog box. You do not have to show all 3 buttons, but you need to show at least 1.
You can read the response easily too. The response will always be the text of the button the user click on.
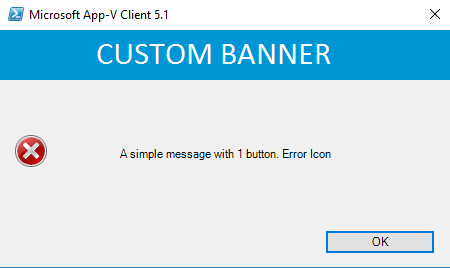
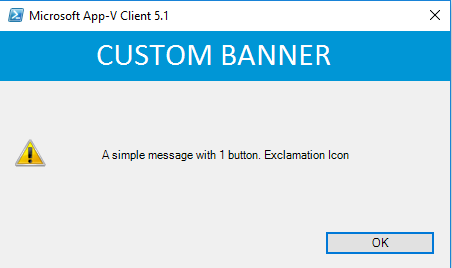
The message box can also have different icons. The default is without any icons.
Show-InstallationPrompt -Message "A simple message with 1 button. No Icon" -ButtonRightText 'OK'There are several options to choose from, with the default being no icon
Show-InstallationPrompt -Message "A simple message with 1 button. WinLogo Icon" -ButtonRightText 'OK' -Icon 'WinLogo'Application, WinLogo:

Error, Hand:
Exclamation, Warning:
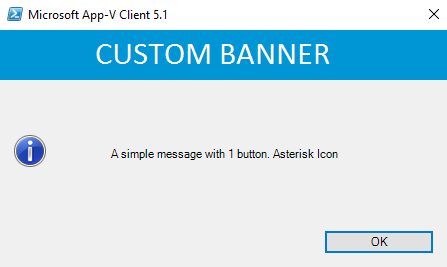
Asterisk, Information:
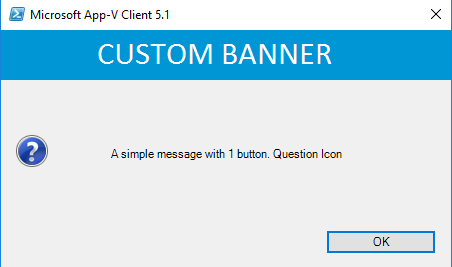
Question:
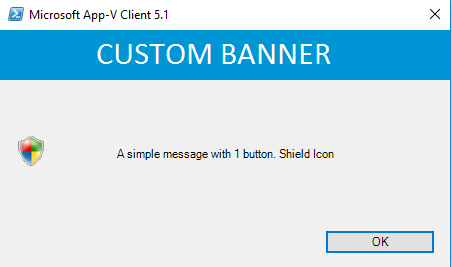
Shield:
With that out of the way, let us now look at the actual MSI and EXE installation.
##*===============================================
##* INSTALLATION
##*===============================================
[string]$installPhase = 'Installation'
## &amp;lt;Perform Installation tasks here&amp;gt;
Show-InstallationProgress -StatusMessage "Installing $installTitle"
$exitCode = Execute-Process -Path 'appv_client_setup.exe' -Parameters "/CEIPOPTIN=0 /MUOPTIN=0 /ACCEPTEULA=1 /NORESTART /q /ENABLEPACKAGESCRIPTS=1 /Log $logTempFolder\AppVInstall.log" -PassThru
#Show-InstallationProgress -StatusMessage "Installing $installTitle Client UI"
$exitCode = Execute-MSI -Path 'appv_client_ui_setup.msi' -Action 'Install' -AddParameters 'AcceptEULA=1 ALLUSERS=1'The install steps are actually pretty simple, with a straight forward install exe, and the client UI MSI.
For EXE files, we need to provide the full command line, including restart options or logging options. Logs should be set to $logTempFolder as this will allow the logs to be saved to the same compressed file for the entire installation script.
For MSI, some defaults are always applied. If you recall earlier, we looked at the toolkit default. Installs are always passive with no reboot and uninstalls are always silent with no reboot. MSI installs are also always logged. So we do not need to specify these options, unless we need to overwrite the defaults. To overwrite parameters, use the switch -Parameters. To keep the default parameters and add new values, use the switch -AddParameters
I will not go into the details of the uninstall, but we do prompt the user first, before we proceed with the uninstallation.
##*===============================================
##* PRE-UNINSTALLATION
##*===============================================
[string]$installPhase = 'Pre-Uninstallation'
## Show Progress Message (with the default message)
Show-InstallationProgress
## &amp;lt;Perform Pre-Uninstallation tasks here&amp;gt;
$response = Show-InstallationPrompt -Message "Uninstalling $installTitle will also remove all App-V applications installed on this machine. `n`nClose all applications and click OK to proceed. `nClick Cancel to uninstall $installTitle later and cancel the current uninstallation" -ButtonLeftText 'OK' -ButtonRightText 'Cancel'
if ($response -eq 'Cancel')
{
Exit-Script -ExitCode 69003 #this code to indicate user clicked to uninstall App-V Client later
}
##*===============================================
##* UNINSTALLATION
##*===============================================
[string]$installPhase = 'Uninstallation'
# &amp;lt;Perform Uninstallation tasks here&amp;gt;
Show-InstallationProgress -StatusMessage "Uninstalling $installTitle"
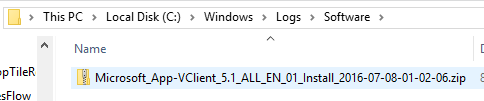
Execute-Process -Path 'appv_client_setup.exe' -Parameters '/UNINSTALL /NORESTART /Q' -PassThruOk, this should be sufficient for our script now. Once you run the script, the log files will be saved to C:\Windows\Logs\Software.
I hope this has been helpful. I’ll be writing a much deeper dive soon, including looking as the extensions the toolkit allows us to write.
Till next time.
Very well written instruction, thanks a lot. I am working on server deployment process, and looking for direction to develop script to install multiple applications after basic OS is loaded. In other words, I already have a list of applications need to be installed (like Symantec SEP, CSP, BigFix BES client …) . And I have tested each individual install with my scripts developed with Batch, VB, PowerShell without issue. I can see PADT can be used for individual/single application install with dependencies as your post shows. And it is possible to import individual application install in MDT.
I wonder if I can use PADT to install multiple applications in sequence standalone without MDT or other packaging tools?
Very useful article, Thanks for sharing and I hope to see more soon!
Is there a way to change the progress install Show-InstallationProgress style to show a progress bar rather then the swirling circle?
my company policy says remote signed ps scripts can only run. Any idea how we can achive this with PS app deploy toolkit. Thanks in Advance
HI Vatti,
It depends on how you plan to run the script.
If you use the provided Deploy-Application.exe in the toolkit, and deploy using SCCM, this will run elevated and Deploy-Application.exe uses the following command to launch Powershell:
PowerShell.exe" -ExecutionPolicy Bypass -NoProfile -NoLogo -WindowStyle Hidden -Command & { & '\Deploy-Application.ps1'; Exit $LastExitCode } -ExecutionPolicy Bypass helps with unsigned scripts.
This is the simplest way to get things working and works fine (almost) all the time.
Hello,
I’am looking for appv_client_ui_setup.msi but microsoft link is down, do you know where can i download it?